4. Pipes and Filters
Overview
Questions
- How can I combine existing commands to do new things?
Objectives
- Redirect a command’s output to a file.
- Process a file instead of keyboard input using redirection.
- Construct command pipelines with two or more stages.
- Explain what usually happens if a program or pipeline isn’t given any input to process.
- Explain Unix’s ‘small pieces, loosely joined’ philosophy.
Keypoints
catdisplays the contents of its inputs.headdisplays the first 10 lines of its input.taildisplays the last 10 lines of its input.sortsorts its inputs.wccounts lines, words, and characters in its inputs.command > fileredirects a command’s output to a file (overwriting any existing content).command >> fileappends a command’s output to a file.<operator redirects input to a commandfirst | secondis a pipeline: the output of the first command is used as the input to the second.- The best way to use the shell is to use pipes to combine simple single-purpose programs (filters).
Let’s Get Started
Now that we know a few basic commands, we can finally look at the shell’s most powerful feature: the ease with which it lets us combine existing programs in new ways. We’ll start with a directory called molecules that contains six files describing
some simple organic molecules. The .pdb extension indicates that these files are in Protein Data Bank format, a simple text format that specifies the type and position of each atom in the molecule.
Input:
$ ls molecules
Output:
cubane.pdb    ethane.pdb    methane.pdb
octane.pdb    pentane.pdb   propane.pdb
Let’s go into that directory with cd and run the command wc *.pdb. wc is the “word count” command: it counts the number of lines, words, and characters in files (from left to right, in that order).
The * in *.pdb matches zero or more characters, so the shell turns *.pdb into a list of all .pdb files in the current directory:
Input:
$ cd molecules
$ wc *.pdb
Output:
20  156  1158  cubane.pdb
12  84   622   ethane.pdb
 9  57   422   methane.pdb
30  246  1828  octane.pdb
21  165  1226  pentane.pdb
15  111  825   propane.pdb
107  819  6081  total
If we run wc -l instead of just wc, the output shows only the number of lines per file:
Input:
$ wc -l *.pdb
Output:
20  cubane.pdb
12  ethane.pdb
 9  methane.pdb
30  octane.pdb
21  pentane.pdb
15  propane.pdb
107  total
Why Isn’t It Doing Anything?
Why Isn’t This Working?
What happens if a command is supposed to process a file, but we don’t give it a filename? For example, what if we type:
Input:
$ wc -l
but don’t type *.pdb (or anything else) after the command? Since it doesn’t have any filenames, wc assumes it is supposed to process input given at the command prompt, so it just sits there and waits for us to give it some data interactively. From the outside, though, all we see is it sitting there: the command doesn’t appear to do anything.
If you make this kind of mistake, you can escape out of this state by holding down the control key (Ctrl) and typing the letter C once and letting go of the Ctrl key. Ctrl+C
We can also use -w to get only the number of words, or -c to get only the number of characters.
Which of these files contains the fewest lines? It’s an easy question to answer when there are only six files, but what if there were 6000? Our first step toward a solution is to run the command:
Input:
$ wc -l *.pdb > lengths.txt
The greater than symbol, >, tells the shell to redirect the command’s output to a file instead of printing it to the screen. (This is why there is no screen output: everything that wc would have printed has gone into the file lengths.txt instead.) The shell will create the file if it doesn’t exist. If the file exists, it will be silently overwritten, which may lead to data loss and thus requires some caution. ls lengths.txt confirms that the file exists:
Input:
$ ls lengths.txt
Output:
$ lengths.txt
We can now send the content of lengths.txt to the screen using cat lengths.txt. cat stands for “concatenate”: it prints the contents of files one after another. There’s only one file in this case, so cat just shows us what it contains:
Input:
$ cat lengths.txt
Output:
20  cubane.pdb
12  ethane.pdb
 9  methane.pdb
30  octane.pdb
21  pentane.pdb
15  propane.pdb
107  total
Output Page by Page
We’ll continue to use cat in this lesson, for convenience and consistency, but it has the disadvantage that it always dumps the whole file onto your screen. More useful in practice is the command less, which you use with less lengths.txt. This displays a screenful of the file, and then stops. You can go forward one screenful by pressing the spacebar, or back one by pressing b. Press q to quit.
Now let’s use the sort command to sort its contents.
Exercise: What Does sort -n Do?
If we run sort on a file containing the following lines:
 10
 2
 19
 22
 6
the output is::
 10
 19
 2
 22
 6
If we run sort -n on the same input, we get this instead:
 2
 6
 10
 19
 22
Explain why -n has this effect.
Solution
The ‘-n’ option specifies a numerical rather than an alphanumerical sort.
We will also use the -n option to specify that the sort is numerical instead of alphanumerical. This does not change the file; instead, it sends the sorted result to the screen:
Input:
$ sort -n lengths.txt
Output:
9  methane.pdb
12  ethane.pdb
15  propane.pdb
20  cubane.pdb
21  pentane.pdb
30  octane.pdb
107  total
We can put the sorted list of lines in another temporary file called sorted-lengths.txt by putting > sorted-lengths.txt after the command, just as we used > lengths.txt to put the output of wc into lengths.txt. Once we’ve done that, we can
run another command called head to get the first few lines in sorted-lengths.txt:
Input:
$ sort -n lengths.txt > sorted-lengths.txt
$ head -n 1 sorted-lengths.txt
Output:
9 methane.pdb
Using -n 1 with head tells it that we only want the first line of the file; -n 20 would get the first 20, and so on. Since sorted-lengths.txt contains the lengths of our files ordered from least to greatest, the output of head must be the
file with the fewest lines.
Redirecting to the same file
It’s a very bad idea to try redirecting the output of a command that operates on a file to the same file. For example:
$ sort -n lengths.txt lengths.txt
Doing something like this may give you incorrect results and/or delete the contents of lengths.txt.
What Does >> Mean?
We have seen the use of >, but there is a similar operator >> which works slightly differently. We’ll learn about the differences between these two operators by printing some strings. We can use the echo command to print strings e.g.
Input:
$ echo The echo command prints text
Output:
The echo command prints text
Exercise: echo
Now test the commands below to reveal the difference between the two operators:
Input:
$ echo hello testfile01.txt
and
Input:
$ echo hello > testfile02.txt
Hint: Try executing each command twice in a row and then examining the output files.
Solution
In the first example with ‘’, the string “hello” is written to ‘testfile01.txt’, but the file gets overwritten each time we run the command.
We see from the second example that the ‘>’ operator also writes “hello” to a file (in this case ‘testfile02.txt’), but appends the string to the file if it already exists (i.e. when we run it for the second time).
Appending Data
We have already met the head command, which prints lines from the start of a file. tail is similar, but prints lines from the end of a file instead.
Exercise: tail
Consider the file data-shell/data/animals.txt. After these commands, select the answer that corresponds to the file animals-subset.txt:
 $ head -n 3 animals.txt > animals-subset.txt
 $ tail -n 2 animals.txt >> animals-subset.txt
- The first three lines of
animals.txt - The last two lines of
animals.txt - The first three lines and the last two lines of
animals.txt - The second and third lines of
animals.txt
Solution
Option 3 is correct.
- For option 1 to be correct we would only run the ‘head’ command
- For option 2 to be correct we would only run the ‘tail’ command.
- For option 4 to be correct we would have to pipe the output of ‘head’ into ‘tail -n 2’ by doing
head -n 3 animals.txt | tail -n 2 animals-subset.txt
If you think this is confusing, you’re in good company: even once you understand what wc, sort, and head do, all those intermediate files make it hard to follow what’s going on. We can make it easier to understand by running sort and head
together:
Input:
$ sort -n lengths.txt | head -n 1
Output:
9 methane.pdb
The vertical bar, |, between the two commands is called a pipe. It tells the shell that we want to use the output of the command on the left as the input to the command on the right.
Nothing prevents us from chaining pipes consecutively. That is, we can for example send the output of wc directly to sort, and then the resulting output to head. Thus we first use a pipe to send the output of wc to sort:
Input:
$ wc -l *.pdb | sort -n
Output:
9 methane.pdb
12 ethane.pdb
15 propane.pdb
20 cubane.pdb
21 pentane.pdb
30 octane.pdb
107 total
And now we send the output of this pipe, through another pipe, to head, so that the full pipeline becomes:
Input:
$ wc -l *.pdb | sort -n | head -n 1
Output:
9 methane.pdb
This is exactly like a mathematician nesting functions like log(3x) and saying “the log of three times x”. In our case, the calculation is “head of sort of line count of *.pdb”.
The redirection and pipes used in the last few commands are illustrated below:
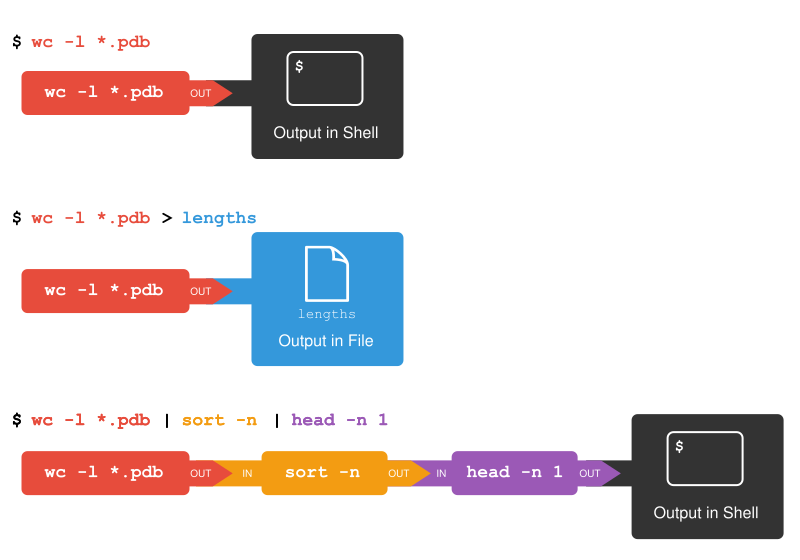
Piping Commands Together
Exercise: pipes
In our current directory, we want to find the 3 files which have the least number of lines. Which command listed below would work?
1. `wc -l *  sort -n  head -n 3`
2. `wc -l * | sort -n | head -n 1-3`
3. `wc -l * | head -n 3 | sort -n`
4. `wc -l * | sort -n | head -n 3`
Solution
Option 4 is the solution.
The pipe character | is used to connect the output from one command to
the input of another.
> is used to redirect standard output to a file.
Try it in the data-shell/molecules directory!
This idea of linking programs together is why Unix has been so successful. Instead of creating enormous programs that try to do many different things, Unix programmers focus on creating lots of simple tools that each do one job well, and that work well with each other. This programming model is called “pipes and filters”.
We’ve already seen pipes; a filter is a program like wc or sort that transforms a stream of input into a stream of output. Almost all of the standard Unix tools can work this way: unless told to do otherwise, they read from standard input, do
something with what they’ve read, and write to standard output.
The key is that any program that reads lines of text from standard input and writes lines of text to standard output can be combined with every other program that behaves this way as well. You can and should write your programs this way so that you and other people can put those programs into pipes to multiply their power.
Exercise: Pipe Reading Comprehension
A file called animals.txt (in the data-shell/data folder) contains the following data:
2012-11-05,deer
2012-11-05,rabbit
2012-11-05,raccoon
2012-11-06,rabbit
2012-11-06,deer
2012-11-06,fox
2012-11-07,rabbit
2012-11-07,bear
What text passes through each of the pipes and the final redirect in the pipeline below?
$ cat animals.txt | head -n 5 | tail -n 3 | sort -r final.txt
Hint: build the pipeline up one command at a time to test your understanding
Solution
The ‘head’ command extracts the first 5 lines from ‘animals.txt’.
Then, the last 3 lines are extracted from the previous 5 by using the ‘tail’ command.
With the ‘sort -r’ command those 3 lines are sorted in reverse order and finally, the output is redirected to a file ‘final.txt’.
The content of this file can be checked by executing ‘cat final.txt’.
The file should contain the following lines:
  2012-11-06,rabbit
  2012-11-06,deer
  2012-11-05,raccoon
Pipe Construction
Exercise: More piping
For the file animals.txt from the previous exercise, consider the following command:
$ cut -d , -f 2 animals.txt
The cut command is used to remove or “cut out” certain sections of each line in the file. The optional -d flag is used to define the delimiter. A delimiter is a character that is used to separate each line of text into columns. The default delimiter is Tab, meaning that the cut command will automatically assume that values in different columns will be separated by a tab. The -f flag is used to specify the field (column) to cut out.
The command above uses the -d option to split each line by comma, and the -f option
to print the second field in each line, to give the following output:
 deer
 rabbit
 raccoon
 rabbit
 deer
 fox
 rabbit
 bear
The uniq command filters out adjacent matching lines in a file. How could you extend this pipeline (using uniq and another command) to find out what animals the file contains (without any duplicates in their names)?
Solution
$ cut -d , -f 2 animals.txt | sort | uniq
Which Pipe?
Exercise: animals.txt
The file animals.txt contains 8 lines of data formatted as follows:
 2012-11-05,deer
 2012-11-05,rabbit
 2012-11-05,raccoon
 2012-11-06,rabbit
The uniq command has a -c option which gives a count of the number of times a line occurs in its input. Assuming your current directory is data-shell/data/, what command would you use to produce a table that shows the total count of each type of animal in the file?
sort animals.txt | uniq -csort -t, -k2,2 animals.txt | uniq -ccut -d, -f 2 animals.txt | uniq -ccut -d, -f 2 animals.txt | sort | uniq -ccut -d, -f 2 animals.txt | sort | uniq -c | wc -l
Solution
Option 4. is the correct answer.
If you have difficulty understanding why, try running the commands, or sub-sections of the pipelines (make sure you are in the ‘data-shell/data’ directory).
Nelle’s Pipeline: Checking Files
Nelle has run her samples through the assay machines
and created 17 files in the north-pacific-gyre/2012-07-03 directory described earlier.
As a quick sanity check, starting from her home directory, Nelle types:
Input:
$ cd north-pacific-gyre/2012-07-03
$ wc -l *.txt
The output is 18 lines that look like this:
Output:
300 NENE01729A.txt
300 NENE01729B.txt
300 NENE01736A.txt
300 NENE01751A.txt
300 NENE01751B.txt
300 NENE01812A.txt
Now she types this:
Input:
$ wc -l *.txt | sort -n | head -n 5
Output:
240 NENE02018B.txt
300 NENE01729A.txt
300 NENE01729B.txt
300 NENE01736A.txt
300 NENE01751A.txt
Whoops: one of the files is 60 lines shorter than the others. When she goes back and checks it, she sees that she did that assay at 8:00 on a Monday morning — someone was probably in using the machine on the weekend, and she forgot to reset it. Before re-running that sample, she checks to see if any files have too much data:
Input:
$ wc -l *.txt | sort -n | tail -n 5
Output:
300 NENE02040B.txt
300 NENE02040Z.txt
300 NENE02043A.txt
300 NENE02043B.txt
5040 total
Those numbers look good — but what’s that ‘Z’ doing there in the third-to-last line? All of her samples should be marked ‘A’ or ‘B’; by convention, her lab uses ‘Z’ to indicate samples with missing information. To find others like it, she does this:
Input:
$ ls *Z.txt
Output:
NENE01971Z.txt NENE02040Z.txt
Sure enough, when she checks the log on her laptop, there’s no depth recorded for either of those samples. Since it’s too late to get the information any other way, she must exclude those two files from her analysis. She could just delete them using
rm, but there are actually some analyses she might do later where depth doesn’t matter, so instead, she’ll just be careful later on to select files using the wildcard expression *[AB].txt.
As always, the * matches any number of characters; the expression [AB] matches either an ‘A’ or a ‘B’, so this matches all the valid data files she has.
Exercise: Wildcard Expressions
Wildcard expressions can be very complex, but you can sometimes write them in ways that only use simple syntax, at the expense of being a bit more verbose.
Consider the directory data-shell/north-pacific-gyre/2012-07-03 : the wildcard expression *[AB].txt matches all files ending in A.txt or B.txt. Imagine you forgot about this.
-
Can you match the same set of files with basic wildcard expressions that do not use the
[]syntax? Hint: You may need more than one expression. -
The expression that you found and the expression from the lesson match the same set of files in this example. What is the small difference between the outputs?
-
Under what circumstances would your new expression produce an error message where the original one would not?
Solution
- A solution using two wildcard expressions:
$ ls *A.txt
$ ls *B.txt
- The output from the new commands is separated because there are two commands.
- When there are no files ending in ‘A.txt’, or there are no files ending in ‘B.txt’.
Exercise: Removing Unneeded Files
Suppose you want to delete your processed data files, and only keep your raw files and processing script to save storage. The raw files end in .dat and the processed files end in .txt. Which of the following would remove all the processed data
files, and only the processed data files?
rm ?.txtrm *.txtrm * .txtrm *.*
Solution
- This would remove ‘.txt’ files with one-character names
- This is correct answer
- The shell would expand ‘ * ‘ to match everything in the current directory, so the command would try to remove all matched files and an additional file called ‘.txt’
- The shell would expand ‘.’ to match all files with any extension, so this command would delete all files
Bio Break!
Let’s take a brief break to stretch before moving on to the next page. See you in a few minutes.